Power BI enables developers to implement Row-level-security (RLS) in their reports, which is a powerful feature that allows you to restrict data access at the row level. With RLS, you can ensure that users only see the data that they are authorized to see. This feature is particularly useful in situations where you have sensitive data that should only be accessible to certain users or teams. In this blog, I will give you an introduction on how to create RLS roles, add new users to these roles and what the difference between dynamic and static RLS roles are. But before jumping into more details let’s have a general look at how RLS in Power BI works and why it is an essential feature for implementing business reporting solutions.
How does RLS work?
At its core, RLS works by applying filters to your data and linking the filter statement to an RLS role. You can define these filter statements in Power BI in the form of DAX statements (e.g. Regions[Region] = “Switzerland”) to shrink down your DIM tables, which in turn reduces the rows available in your Fact table. In a second step, you can assign users or groups to your created RLS roles in the Power BI Service.
Why is RLS important?
The importance of RLS revolves mainly around the possibility to meet security and compliance requirements. The most obvious reason why RLS roles are important is to ensure data security. By implementing RLS roles, you can limit access to sensitive data only to those users who have been granted permission to view it. This ensures that confidential information is not leaked or accessed by unauthorized users, protecting your business from data breaches or other security threats. Furthermore, RLS provides ways to meet compliance standards regarding data privacy regulations. Many industries have strict regulations around data access and privacy.
Implementation of RLS
In the next few sections, we will create both static and dynamic RLS roles as well as discuss the pros and cons of both options. Furthermore, we will test roles in PBI desktop before publishing the report and assign users to the created RLS roles from within the PBI service. All examples are based on the AdventureWork Sales dataset which can be downloaded here if you want to follow along.
Create a static RLS role
Let’s imagine the following scenario: We are building a sales report that will be tested in Germany and then rolled out globally. An important requirement is that the head of the respective country should only see the transactions in his country. We can achieve this by creating and assigning a static RLS role for the head of Germany. To do so we need to:
- Go to the Modeling tab in the Report view and select Manage roles

- Click on Create and enter a name for the RLS role
- Under Tables go to the table you want to apply a filter statement on, click on the three dots, add filter and select the column you want to apply an RLS filter on. In our case, we used the table Sales Territory and the column Country.
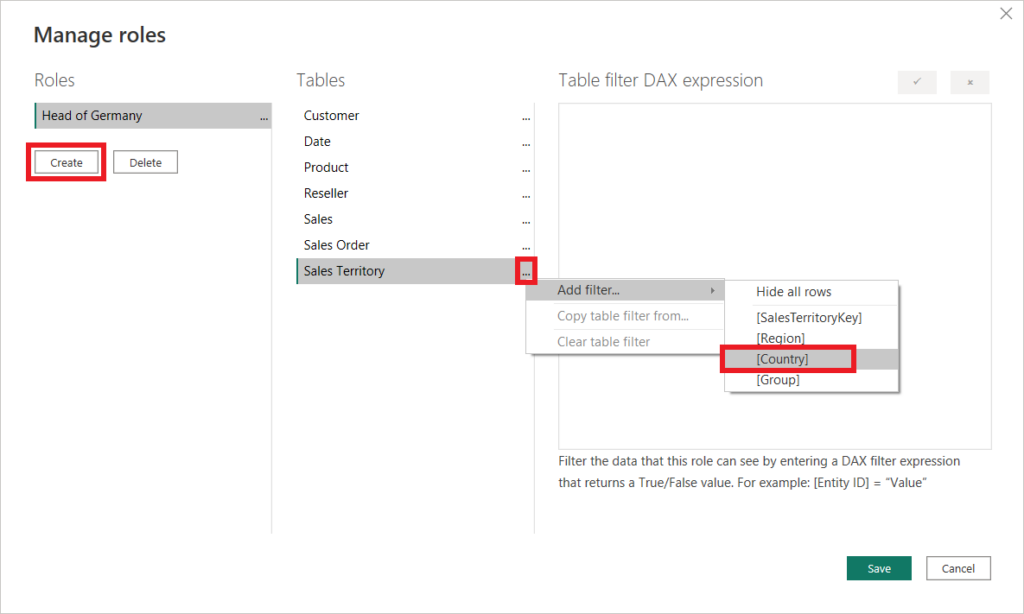
- Define the DAX statement for the filter you want to apply on your RLS role and click Save
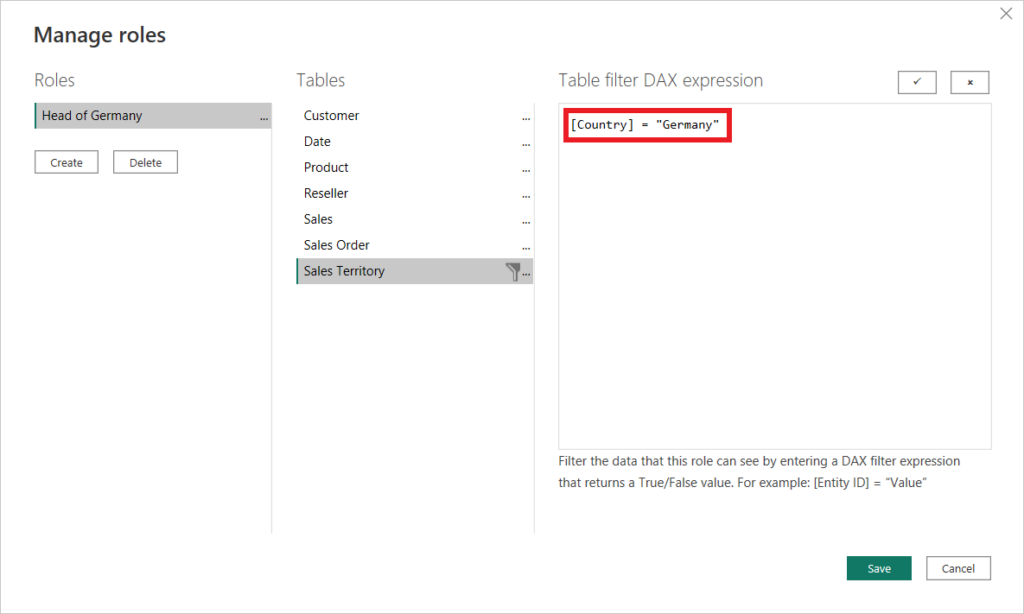
Testing a RLS role
It is important to test your RLS role after the creation to verify that it has the intended effect.
- Go to the Modeling tab in the Report view and select View as

- Select the RLS role you created, in our case it is the role Head of Germany
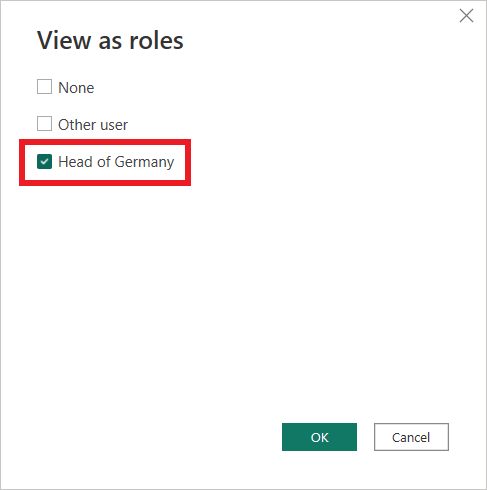
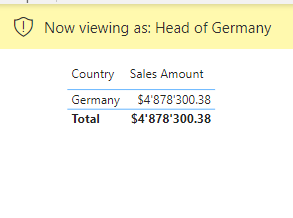
- Check the result on a visual, in our case a table showing the sum of sales per country (left picture: before applying RLS, right picture: after applying RLS)

Create a dynamic RLS role
Static RLS roles are easy and fast to implement. However, if we want to expand our RLS logic for other countries we have to create a role for each country. In our scenario, the effort is manageable, since there are only six countries but requirements for RLS can grow fast. Perhaps after the rollout for the management we also want to enable all of our salespeople to consume our report. In this case, it would be necessary to restrict the access of each sales employee to only see their own sales transaction. Creating hundreds of RLS roles and especially managing them afterward in the case of position changes is not a viable solution with static RLS roles. Luckily there is an alternative, namely dynamic RLS roles, whereas filter statements can be based on the signed-in user, using their user principal name (UPN) to filter our data.
To implement dynamic RLS we first need to create the support table that defines how the data should be filtered based on the currently signed in UPN. This support table can come from whatever source you like, even from the source system of your data. In our example, we will create the table with manually entered values. We will create a support table to enable dynamic RLS for each head of sales of the different countries.
- In the Home tab click on Enter data
- Create a table with two columns (CountryName and UPN) and rename the table
- Enter the values for the countries you want to implement RLS on
- In the UPN column enter the corresponding user principal name (for testing purposes you can enter your own UPN)
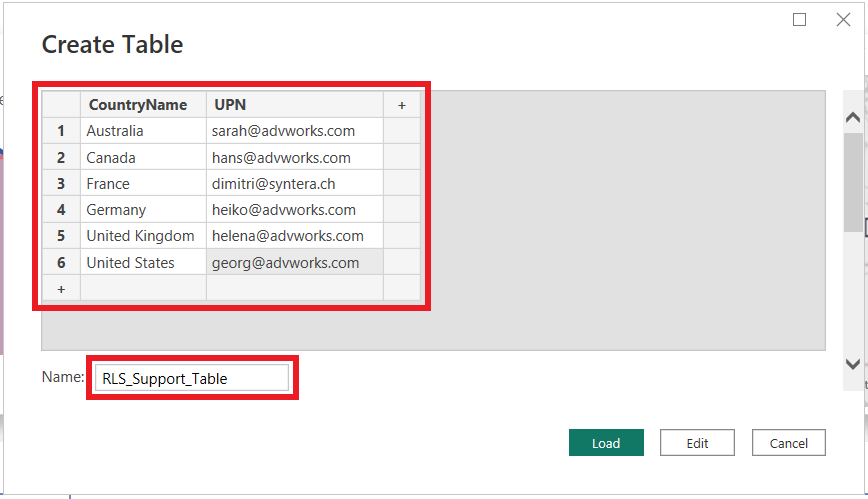
After creating the support table we have to define its relationship with the rest of the data model.
- Under Model go to the Home tab and click on Manage relationships
- Click on New… and choose the RLS_Support_Table and mark the CountryName column
- For the second table choose Sales Territory and mark the column Country
- Check the cardinality and cross filter direction and click on OK

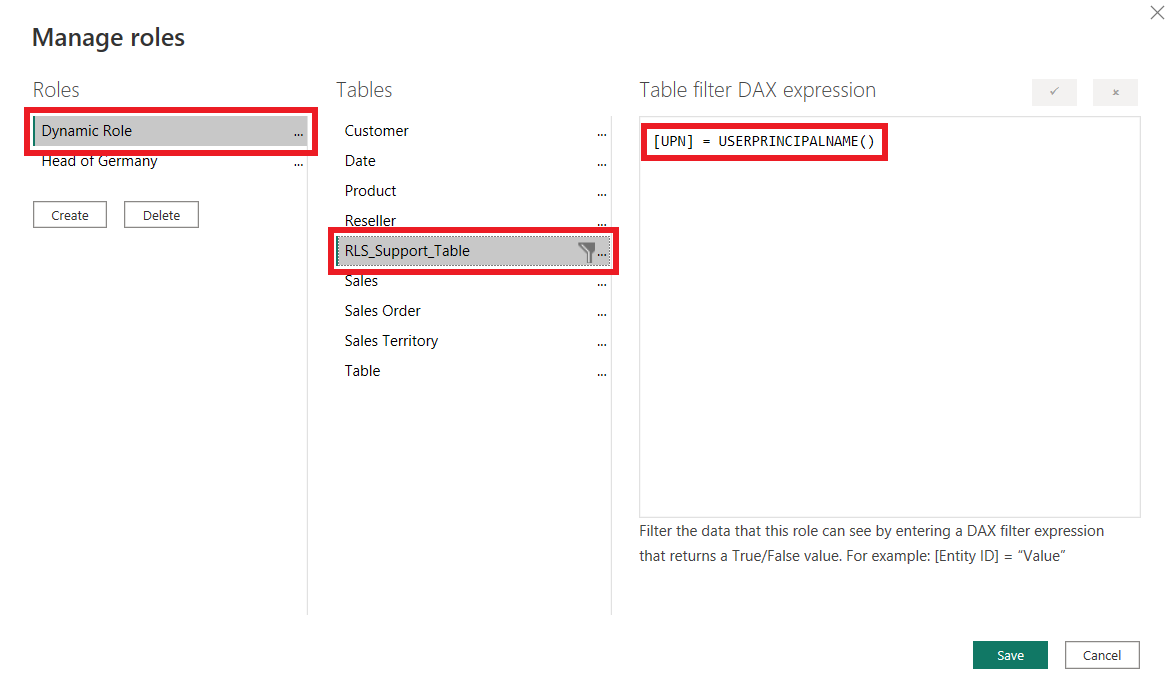
Now that the relationship for the support table is defined we can finally create a dynamic RLS role
- Go to the Modeling tab in the Report view and select Manage roles
- Create a new role, select the RLS_Support_Table and define the DAX statement as follows: [UPN] = USERPRINCIPALNAME()
- Note: the DAX function USERPRINCIPALNAME() returns the UPN of the currently signed-in user

Testing a dynamic RLS role
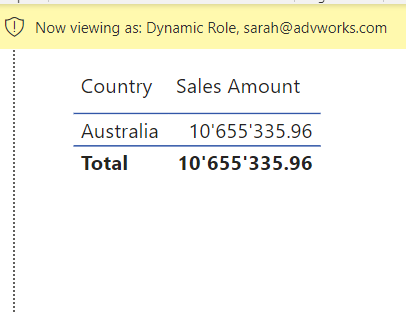
Testing dynamic roles with your own user principal name works in the same way as with static roles. Furthermore, PBI gives you the option to test dynamic roles in the context of other UPNs. Let’s test if the access of the head of Australia is restricted correctly by testing the dynamic RLS role in the context of the user sarah@advworks.com
- Go to the Modeling tab in the Report view and select View as
- Select the dynamic role you defined
- Select the checkbox for Other user and enter the UPN in the context in which you want to test the dynamic RLS role (in our case: sarah@advworks)
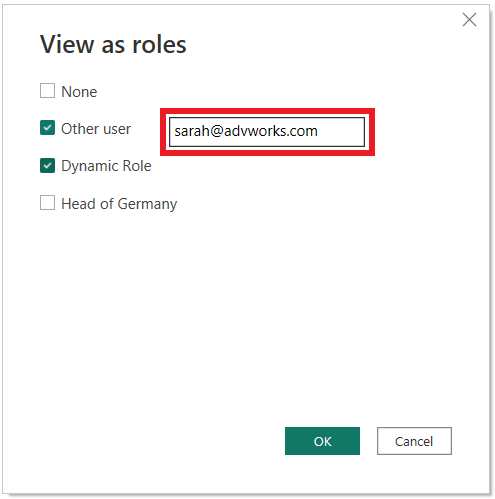
- Check the result on a visual, in our case a table showing the sum of sales per country (left picture: before applying RLS, right picture: after applying RLS)

Assigning RLS roles
Now that we have created our RLS role the last step is to assign the corresponding users to them. To do so we need to switch to the Power BI Service
- In Power BI Service go to the dataset of the published report, click on the three dots and then on Security
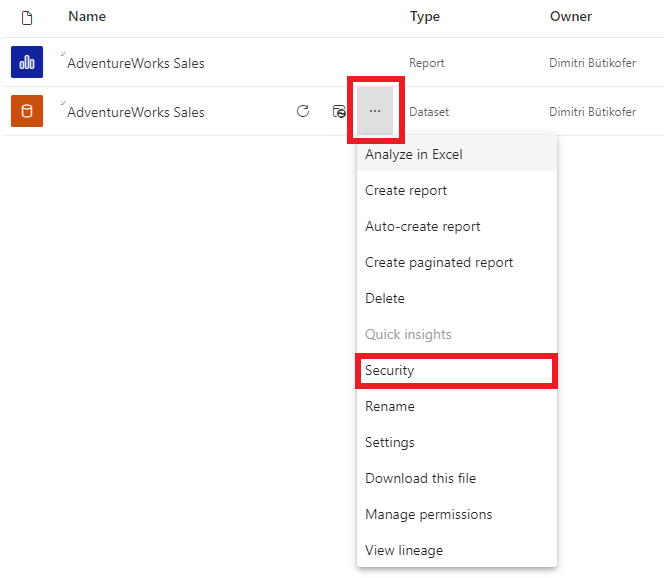
- Select the desired role and enter a user, user group or security group

Static vs. dynamic RLS rules
In our example, both static as well as dynamic RLS rules are viable solutions for our requirements. So you may wonder when to use what type of RLS rule. As always the answer depends heavily on the specific requirements you are dealing with. Let’s go over the pros and cons of both approaches:
Static RLS roles Pros:
- Static RLS is easier to set up and maintain than dynamic row-level security, especially for simple scenarios.
- It allows for a simple (static) set of rule based filters that can be applied to all users of the role, making it easier to manage.
- It is more suitable for scenarios where the access rules don’t change frequently.
Static RLS roles Cons:
- It is not very flexible and cannot accommodate complex access rules or scenarios.
- It requires creating separate roles for each user group, which can be cumbersome for a large number of different RLS roles.
- It requires manual updates to role membership when there are changes in user access (for example due to position changes).
Dynamic RLS roles Pros:
- Dynamic row-level security can handle complex access scenarios and rules.
- Due to the possibility to source your support table directly from your source system, you can setup a solution that adapts to changes in user roles and access permissions automatically
- It is more scalable than static row-level security for large numbers of different RLS roles.
Dynamic RLS roles Cons:
- It requires more effort to set up than static row-level security.
- It can be more challenging to troubleshoot when there are issues with access permissions due to higher complexity.
In conclusion: static RLS is suitable for simple scenarios where the access rules are straightforward and do not change frequently. On the other hand, dynamic row-level security is more appropriate for complex scenarios where the access rules need to be updated frequently and automatically.
4 responses to “Static and dynamic Row-level-Security in Power BI”
[…] Static and dynamic Row-level-Security in Power BI […]
[…] Static and dynamic Row-level-Security in Power BI […]
[…] Static and dynamic Row-level-Security in Power BI […]
[…] Static and dynamic Row-level-Security in Power BI […]